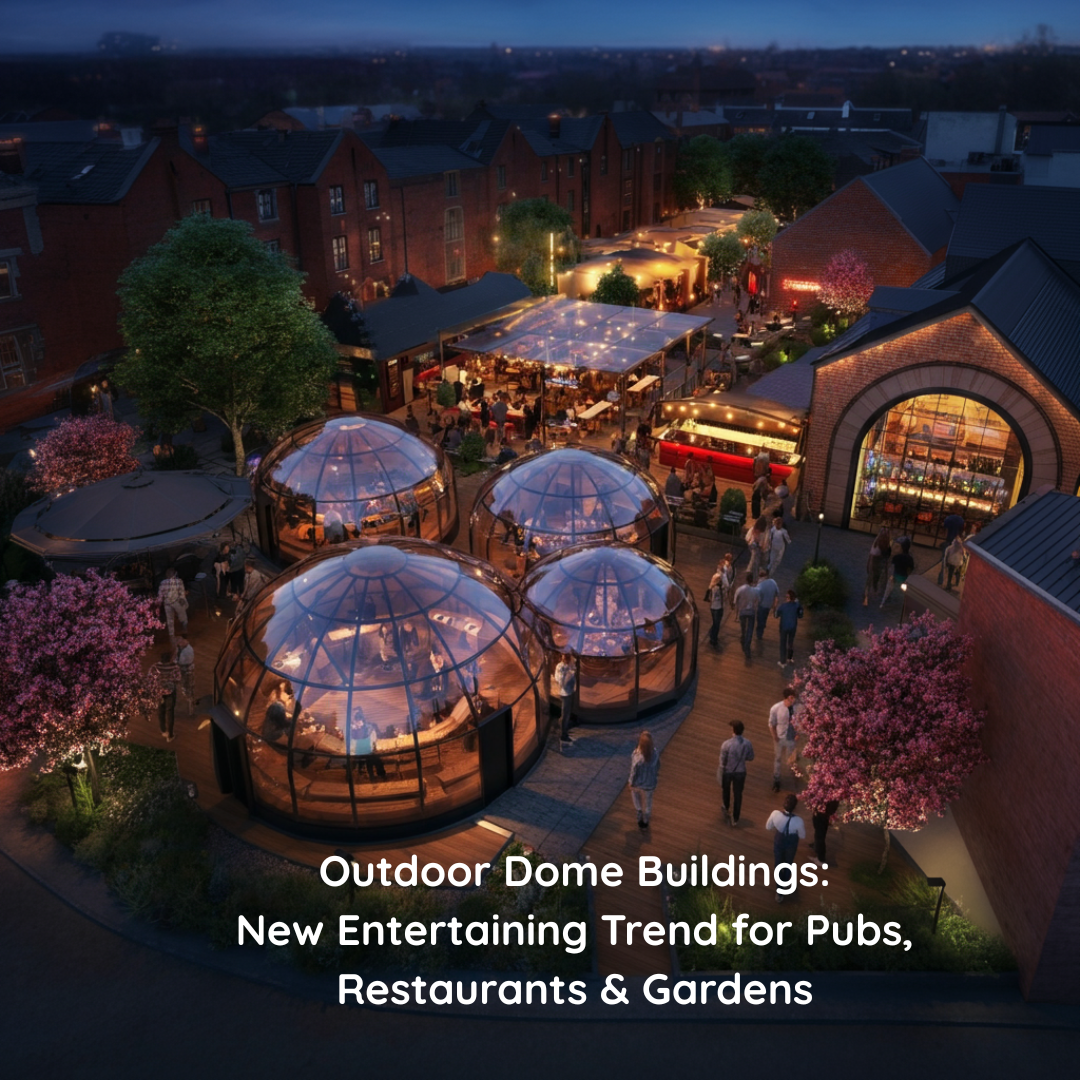
Outdoor Dome Buildings: The New Entertaining Trend for Pubs, Restaurants and Gardens.
Among the rising stars of this trend is the 3.5M Superlux Outdoor Dome Building, a masterpiece redefining outdoor luxury. These unique event spaces could be the game-changing addition your venue or home has been waiting for.
Why Choose Outdoor Dome Buildings?
For pubs, restaurants and gardens, creating memorable experiences is the heart of the business. Outdoor dome structures go beyond being a visual delight—they maximise comfort, extend functionality and evoke a sense of exclusivity.
Imagine turning a section of your venue into an all-weather event space with panoramic views. Or hosting garden soirées beneath a sleek, dome-shaped structure that blends modern design with practicality. Outdoor dome buildings do precisely that, offering spaces designed to inspire conversations, connections and comfort.
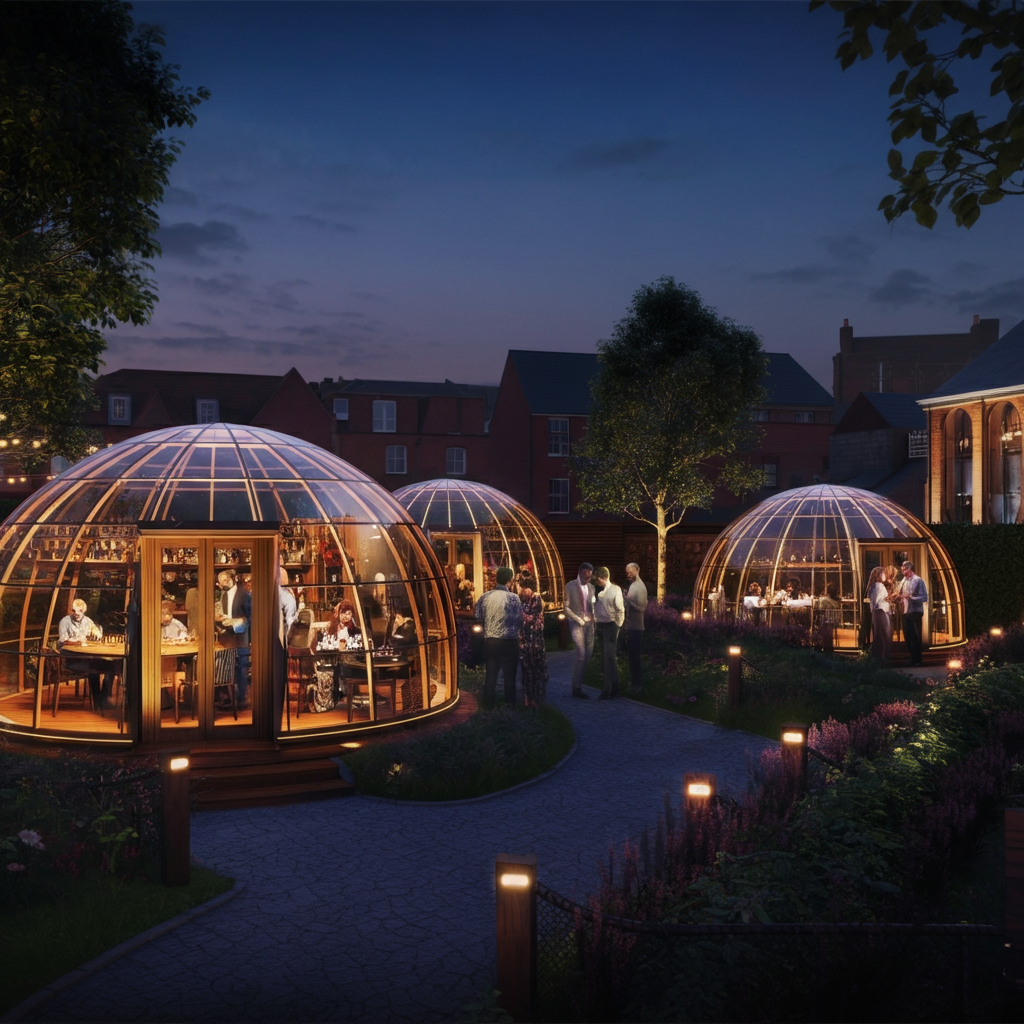
Introducing the 3.5M Superlux Outdoor Dome
The 3.5M Superlux Outdoor Dome Building takes luxury to a whole new level. Whether you’re crafting an intimate evening space for guests or a private sanctuary to escape the urban buzz, this dome’s incredible perks are undeniable.
Key Features That Make It Unique
- Versatile Functionality: Adaptable for private dining, garden gatherings or exclusive events, its spacious interior invites endless possibilities.
- Exceptional Transparency: Made from high-quality materials with up to 90% light transmission, the dome brings you closer to nature while protected from the elements.
- Durability Built to Last: The frame is designed to withstand all weather—rain, wind, or shine—so you can offer reliable comfort year-round.
- Modern Design: Floor-to-ceiling windows provide breathtaking 360° views of the surroundings, seamlessly merging the indoors with the outdoors.
- Energy Efficiency: The dome’s design maximises energy efficiency, reducing both operational costs and environmental impact.
- Privacy and Tranquillity: Its bubble-like structure offers a cosy retreat from the city’s fast pace. Guests can enjoy complete privacy in their serene haven.
Advanced Material Construction
What truly sets the Superlux Dome apart is its cutting-edge, eco-aware construction materials. Designed for ultimate durability and safety, this dome offers features such as:
- UV Protection: Anti-ultraviolet surface layers ensure protection from harmful rays while reducing yellowing and wear caused by the sun.
- High Impact Resistance: Its strength level is up to 250-300 times that of regular glass—perfect for maintaining long-term integrity. Other cheaper versions of domes might need constant replacement of cheaper glass or plastic.
- Wide Temperature Resistance: Withstanding temperatures from -40°C to +120°C, it’s built for diverse environments.
- Flame Retardancy: Rated B1 (GB8624-97), it meets national safety standards with no fire hazards.
Hospitality Meets Elegance
For pubs and restaurants, unique event spaces are key to standing out from competitors. A dome like the Superlux can host everything from wine-tasting evenings to themed dining experiences. Imagine elegantly decorated interiors with ambient lighting, styled to suit the mood of the night—your customers won’t stop snapping pictures.
For urban dwellers, this dome offers an escapist retreat right in your back garden. Whether it’s a late-summer brunch, yoga sessions in the morning light, or simply a cosy corner for stargazing, the 3.5M Superlux allows your outdoor dreams to come to life.
The Perfect Fit for Urban Gardens
Urban garden spaces are constantly balancing functionality with beauty. Domes like the 3.5M Superlux inspire tranquillity and blend effortlessly into their surroundings. Highlight natural plantings, create a focal point with the dome, or use it as an all-weather space to draw visitors into your garden landscape.
Your guests won’t just walk through—they’ll stay, experience the calm, and come back for another chance to enjoy these unforgettable settings.
Why the Time Is Now
From busy restaurant patios to high-end residential backyards, investing in an outdoor dome building brings your space to the forefront of hospitality and design innovation. With their exceptional versatility, sustainability and modern aesthetics, domes represent more than just physical structures—they are experiences waiting to unfold.
Give your patrons or guests something worth talking about. Explore the 3.5M Superlux Outdoor Dome Building to elevate your venue or backyard, and transform how events, evenings and memories are spent.
Explore the Possibilities
Are you ready to redefine outdoor spaces? Whether you’re a pub owner seeking to host themed nights or an urban dweller looking to bring luxury to your outdoor space, the 3.5M Superlux Outdoor Dome is an investment in experiences that last.
Contact us today to learn more about our domes and how they could become part of your unique vision. Together, we’ll create something truly extraordinary.
Further Reading: Pub & Bar – Invest in outdoor spaces, The Outdoor Dome
Request a competitive quote to enhance your outdoor area here